Transferring Items from One Location to Another or Within the Same Location
You may wish to transfer items from one location to another or within the same location. For example, an Action file may no longer be active but you need to keep it as a Reference file. To transfer an item from one location to another, follow these steps:
1. In the Browser, display your locations by selecting the Locations tab.
2. Select the location you wish to transfer from.
3. Select the item you are transferring by clicking on the row selector in the left-most column of the Browser. Click the Transfer button, and the Transfer Wizard is displayed.
4. Select the Summary tab.
Note: The first time you use the Transfer Wizard, you may wish to follow the instructions on the Step by Step tab. Either way is fine, but with the Step by Step option, you'll need to click to go to the next step.
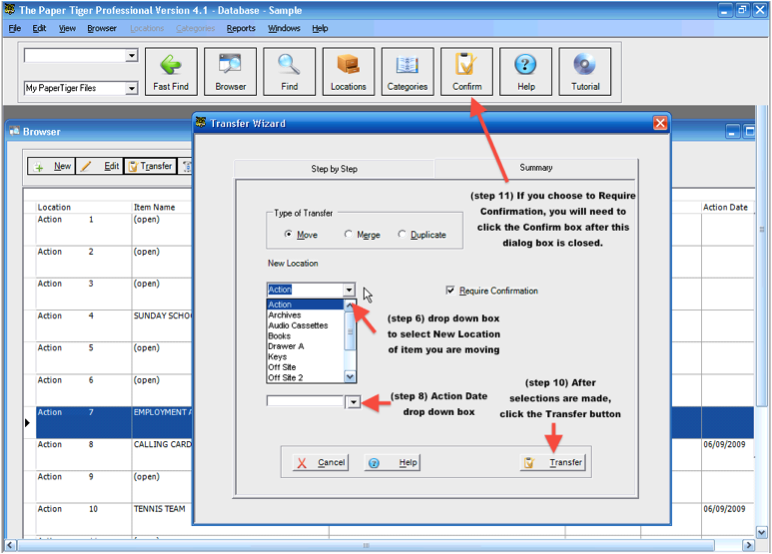
5. Select the type of transfer you are performing:
· Select the Move option button if you are deleting the item from the current location and moving it to a new location.
· (Merge option does not apply to Basic edition) Select the Merge option button if you are merging the item from this location into another item. If the Merge option is selected, the Wizard displays an Item Description drop-down menu. This allows you to select the item that you wish to merge into.
· (Duplicate option does not apply to Basic edition) Select the Duplicate option button if you wish to leave the item in the current location and copy it to another location.
6. Select the location you are transferring the item to from the New Location drop-down list. Note: you can choose to move the item in the same Location.
7. If you selected the Merge option button, select the Item Description from the drop-down list. If you selected Move or Duplicate, skip to step 8.
8. To add an action date to the new item, select the Action Date field and type the date, or select a time interval from the drop-down list.
9. If you wish to confirm the transfer before it occurs, select the Require Confirmation check box.
10. Click the Transfer button. The file location is listed on the Transfers dialog or in the Confirm dialog box
11. Note, if you choose to Require Confirmation, you will need to click the Confirm box. To display a list of your transfer items, click on the Confirm button or select Transfers from the View menu. The list shows all pending transfers, and allows you to confirm or cancel the transfer.
From the Confirm dialog box you can:
· Cancel a pending transfer by clicking under the Cancel column beside each item.
· Confirm a pending transfer by clicking under the Confirm column beside each item.
· Print a Transfer Report. (Click on the Print button)
Paper Tiger will choose the first available open item to place the transferred item.
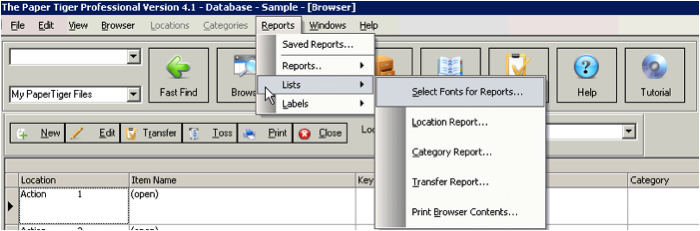
You can also print a Transfer Report from the Reports menu. This report can assist you when moving files from one Location to another Location to ensure your Paper Tiger database matches your physical files.
- Select Reports in the top menu.
- Select Lists submenu.
- Then select Transfer Report
0 Comments